Select
Parent template and click on “Assign” and choose the child template. Click on
Ok
Surendra Sharma

Wednesday, June 5, 2013
Add sitecore reference in web.config file so that we can get intelligence in aspx files
<pages validateRequest="false">
<controls>
<add tagPrefix="sc" namespace="Sitecore.Web.UI.WebControls" assembly="Sitecore.Kernel" />
</controls>
</pages>
Map SiteCore Layout placeholder with Visual Studio
·
Create Template with standard values
·
Create Layout and relate the layout with the
template from Template – Presentation – details – Default – Edit – Select
layout – OK
·
Create Layout Page in Visual Studio with same
name. Add “sc” placeholder tag as
o
<sc:Placeholder
ID="ModelPlaceholder"
Key="ModelPlaceholder"
runat="server"
/>
·
Create XSLT in Sitecore in Layout\Renderings\Component.
Specify Path as “/layouts/Renderings/Components/ModelRendering.xslt”
o
Note: - This Path must map with VS folder
structure path. Check spellings.
·
Add XSLT in VS in “/layouts/Renderings/Components/ModelRendering.xslt”
like
|
<?xml version="1.0" encoding="utf-8"?>
<xsl:stylesheet version="1.0" xmlns:xsl="http://www.w3.org/1999/XSL/Transform" xmlns:sc="http://www.sitecore.net/sc" xmlns:dot="http://www.sitecore.net/dot"
exclude-result-prefixes="dot
sc" >
<xsl:output method="html" indent="yes" encoding="UTF-8"/>
<!-- parameters -->
<xsl:param name="lang" select="'en'"/>
<xsl:param name="id" select="''"/>
<xsl:param name="sc_item"/>
<xsl:param name="sc_currentitem"/>
<!-- entry point -->
<xsl:template match="*">
<!--<xsl:value-of select
="$sc_currentitem"></xsl:value-of>-->
<table>
<tr>
<td>Model Name</td>
<td><sc:text field="ModelName"></sc:text></td>
</tr>
<tr>
<td>Model Number</td>
<td><sc:text field="ModelNumber"></sc:text></td>
</tr>
<tr><td>Model Image</td>
<td>
<sc:image Alt="Car" Width="100px" Height="100px" MaxWidth="500" MaxHeight="500" field="ModelImage"> </sc:image>
</td>
</tr>
</table>
</xsl:template>
</xsl:stylesheet>
|
o
Note: - Keep all tag in small letters like <sc:text as
XSLT is case sensitive. While in VS you can write it as “<sc:Text”. Also
remove “id” and “runat” property from XSLT.
·
Build VS project.
·
Relate the XSLT with the template from Template
– Presentation – details – Default – Edit – Controls – Add – Select XSLT File –
Enter Placeholder name – Select - OK – OK
·
Create Content from template. See preview either
from Presentation – Preview or Publish – Preview.
Map SiteCore Layout with Visual Studio
·
Create Template for movie with standard values
·
Create Layout and relate the layout with the
template from Template – Presentation – details – Default – Edit – Select
layout – OK
·
Create Layout Page in Visual Studio with same
name. Add “sc” tags as
o
<sc:Text ID="ProductName"
Field="ProductName"
runat="server"></sc:Text>
o
<sc:Image ID="ProductImage"
Alt="Car"
Width="100px"
Height="100px"
MaxWidth="500"
MaxHeight="500"
Field="ProductImage"
runat="server"
></sc:Image>
·
Build VS project.
·
Create Content from template. See preview either
from Presentation – Preview or Publish – Preview.
Setup guide for Umbraco
Setup
guide for Umbraco
·
Create one empty database in SQL server.
·
Create folder “D:\Dev”
·
Copy “UmbracoCms.4.11.1.zip” into “D:\Dev” and
Unzip all files of “UmbracoCms.4.11.1.zip”.
·
Cut and paste all files and folder of “D:\Dev \UmbracoCms.4.11.1”
into “D:\Dev” and delete “UmbracoCms.4.11.1.zip” and “UmbracoCms.4.11.1”
folder.
·
Give full permission to “Authenticated Users”, “Self
account” and “IIS_IUSRS”

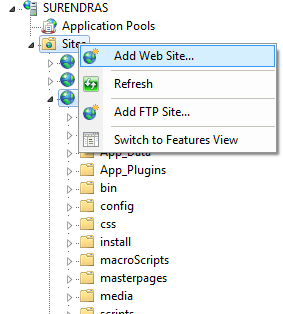
·
Go to IIS and Right click on site and click on “Add
Web Site…”
·
Specify Site
name, physical path and host name as below

·
Open “hosts”
file from “C:\Windows\System32\drivers\etc”
and add entry at last as
<IP Address> <Host
name>
Example: 172.27.150.56 local.umbraco.com
·
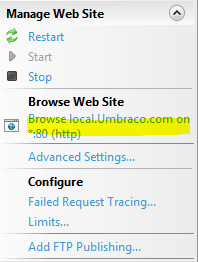
Browse website from IIS
·
On Welcome screen click on “Lets Get Started” button
·
On license screen click on “Accept and Continue”
·
On “Database
configuration” screen fill the database info for empty created database

·
On next Umbraco install database and click
“Continue”
·
On “Create User” screen, create new user as

·
On “Starter
kits” screen select last kit “No Thanks”.

·
On “Install
a Skin” screen, select skin.
·
On next screen,
click on “Setup your new Site”

Note:
You can change DB and other installation
steps from these URLs
Generate 8 digit random alphanumeric number as a initial password in SQL Server
-- generate 8 digit random alphanumeric number as a initial password
declare
@alpha_numeric varchar(8)
set
@alpha_numeric=''
select
@alpha_numeric=@alpha_numeric+char(n) from
(
select top 8 number as n from master..spt_values
where type='p' and (number between 48 and 57 or number between 65 and 90)
order by newid()
) as t
--select @alpha_numeric
OR
Stored Procedure To check whether User already exist or not
CREATE PROCEDURE [dbo].[Proc_User_IsDuplicate]
@UserID AS INT,
@LoginID AS VARCHAR(100)
AS
BEGIN
IF @UserID > 0
BEGIN
IF (SELECT COUNT(*) FROM [User] WHERE
LoginID = @LoginID AND
UserID <> @UserID ) > 0
SELECT 1
IsDuplicate
ELSE
SELECT 0
IsDuplicate
END
ELSE
BEGIN
IF (SELECT COUNT(*) FROM [User] WHERE
LoginID = @LoginID AND IsActive =1) > 0
SELECT 1
IsDuplicate
ELSE
SELECT 0
IsDuplicate
END
END
Subscribe to:
Posts (Atom)