Surendra Sharma

Surendra Sharma

Search This Blog

Friday, September 9, 2016

Learning lesson on branching in SVN


I have worked on different version controls throughout my carrier like - SourceSafe, SVN, TFS, Git, Vault, TFS etc.

Recently we just completed SPRINT cycle of the SITECORE project and I told one of my team member to do the branching in SVN as a best practice.

He just shook his head, “no” and replied me how to do that? 

I was staring my team member and can guess that he was feeling helpless and that’s the reason I am writing this post on branching in SVN. So that’s every developer should know how to do the branching?

What is branching?

In simple term, separating your files from your current working files.

How to do branching?

Go to the folder and right click on empty area and select TortoiseSVN -> Branch/tag... as shown in below image

branching
Branching
Select your branch folder and type folder name in which you want to do branching. Put some comments and choose "Working copy" and click on "Ok" button as shown below


Create Branch Folder

You should receive below successful message on completion of branching operation as shown below
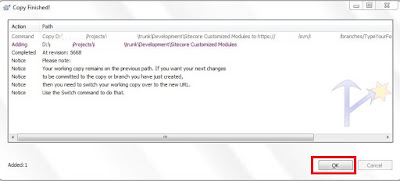
Copy Finished
Copy Finished
 
How to get files from specific branching?

Open folder in which you want to take branch files. Right click on blank area and click on TortoiseSVN -> Repo-browser as


Repo-browser
Repo-browser

Select folder from SVN branch and right click on blank area and choose "Checkout..." as
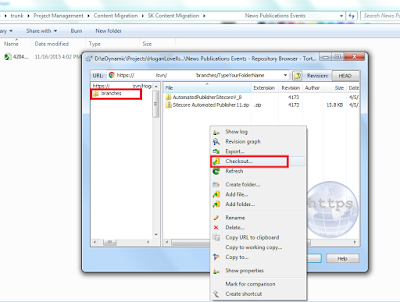
Checkout
Checkout
Verify repository URL and checkout directory. Depth must be Fully recursive and click on OK button as
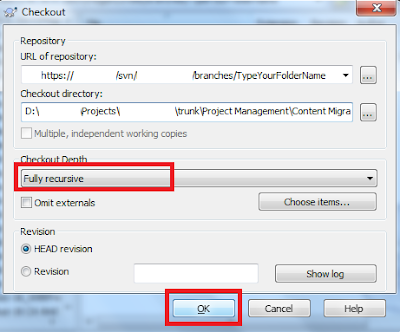
 

Verify Checkout
Verify Checkout

You should receive below screen on completion of checkout operation.


Checkout Finished
Checkout Finished

Boom. That’s it for this time guys.

Happy branching.

Please leave your comments or share this tip if it’s useful for you.

Sunday, September 4, 2016

Deployment platform for Sitecore - MAD


Attend webinar on “MAD deployment platform: effortless reliable and automated Sitecore deployments” by Hinnerk Backer, Director of Software Development in neveling.net.

Here are the key points from this webinar.

Deployment should be effortless, without manual intervention, automated, reliable, zero downtime, transparent, easy rollback. 

For any deployment one need to assemble their own process with deployment tools like Octopus, Sitecore Shipping items, TDS etc.

However there is one more complete deployment platform solution available for Sitecore - MAD.

MAD stands for Multi-Agency Deployment.

The MAD Philosophy
  • Proven, extensible deployment process based on Sitecore best practices
  • Declarative configuration
  • High level of transparency
  • Multi-agency support

Features of MAD
·       
  • Fully automated deployments of files and Sitecore items
  • Easy web based configuration
  • Incremental deployments
  • Automated regression testing
  • Approval-workflows
  • Complete deployment history and rollback
  • Advanced management features
  • Extensibility API

Deployment of application modules

For deployment any module to server using MAD require need to submit module to MAD hub.

Developers/admin can directly upload modules by using web interface.

Developers can check-in their changes and Continue integration environment submit them to SERVER.

MAD service must be installed, configured and running on all the environment to the deployment.
Central service deployed modules and files on Integration Farm(CM), QA-FARM for sanity checks , LIVE FARM(CD).

Seamless deployment can be achieved by blue/green deployment pattern where One LIVE and one Offline site is available.

Nginx reverse proxy is used to switch the site in blue/green deployment pattern.

Both LIVE and OFFLINE site pointing to same Sitecore databases and available on IIS. Below is the procedure to deploy module by MAD which uses blue/green deployment pattern.

  • One should deploy new files on OFFLINE site.
  • Freeze live site
  • Deploy items and publish
  • Warmup
  • Switch reverse proxy
  • Offline LIVE site and make OFFLINE site to LIVE site.

MAD advanced Features for server management

  • Recycle App pol
  • Process dump
  • Rebuild search indexes
  • Run Sitecore jobs
  • IIS reset
  • Verification and repair of installed items and files

Please leave your comments or share this detail if it’s useful for you.

Sunday, August 28, 2016

Content migration guide for Sitecore


Content migration is itself a project within a project and luckily I was extensively involved on different projects where content migration is one of the most important story of the project.

In one of the Sitecore project, I developed lots of scripts to migrate over 500,000 records from different sources to Sitecore.

During these migration, I come across with different situations and found some most suitable way to deal with.

I tried to cover all such technics in this guide. Below are the key topics that I want to emphasized
  • Introduction
  • Questions for client
  • Data Mapping
  • Data Representation and Mapping
  • Source of Data
  • Data Migration Map
  • Why SQL Server
  • Guidelines for content migration resources and team
  • Images and Media
  • SITECORE ITEMS
  • Sitecore Fields
  • Migration Code
  • Log Files
  • Code Technique
  • Testing

I tried my best to include all the scenarios that are associated with content migration.

You can read and download this white paper from here:


Please leave your comments or share this guide if it’s useful for you.