Surendra Sharma

Surendra Sharma

Search This Blog

Tuesday, February 21, 2017

How to dynamically render WFFM Form in MVC

Yes, you can render WFFM form dynamically instead of assigning through presentation.

Below is a MVC syntax for rendering WFFM form

@Html.Sitecore().Rendering("{F2CCA16D-7524-4E99-8EE0-78FF6394A3B3}", new { Datasource = "<id of the form item>", UniqueId = "<unique id of the form rendering>" })

But wait a minute, what is ID {F2CCA16D-7524-4E99-8EE0-78FF6394A3B3}”?
What to assign at Datasource and UniqueId fields in this syntax?

{F2CCA16D-7524-4E99-8EE0-78FF6394A3B3}" is the item ID of MVC Form and its located at Item Path “sitecore/layout/Renderings/Modules/Web Forms for Marketers/Mvc Form”.

Assign form item id to DataSource and UniqueId fields i.e. replace<id of the form item>” and “<unique id of the form rendering>with WFFM form id that you typically created under “sitecore/system/Modules/Web Forms for Marketers” item.

Example – Put below line in any of your cshtml file in MVC

@Html.Sitecore().Rendering("{F2CCA16D-7524-4E99-8EE0-78FF6394A3B3}", new
                        {
                            Datasource = "{C316B617-0306-454E-8729-E44F49B84CDD}",
                            UniqueId = "{C316B617-0306-454E-8729-E44F49B84CDD}"
                        });

Below is the clearer way to understand it
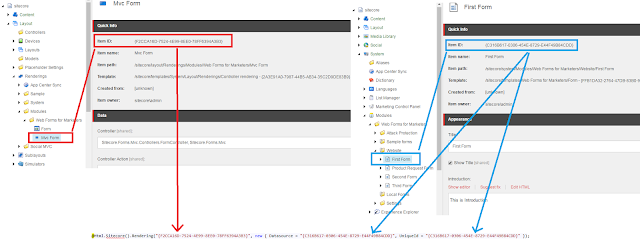

Sitecore WFFM Dynamic Rendering in MVC


I hope you like this Sitecore tip. Stay tuned for more Sitecore related articles.

Till that happy sitecoring :)

Please leave your comments or share this article if it’s useful for you.

Saturday, January 21, 2017

How to avoid “api/sitecore” from Sitecore MVC link URL


There was one Logout link which is working fine in our application, but its URL was looking very weird as http://sitecorelessons/api/sitecore/account/logout.

Client told us to remove that “/api/sitecore” part, even we are also thinking why this “api/sitecore” is coming in URL?

Why “api/sitecore” is coming?

We are generating hyper link with MVC ActionLink() method as 

@Html.ActionLink("Logout", "Logout", "Account", null, new { @class = "btn btn-logout" })

We had used View Rendering for logout section which uses the SitecoreController to render itself and that’s why URL is generated with the default route of Sitecore which ultimately include "api/sitecore" part.

How to solve this?

     1. Create map route for logout action method as

using Sitecore.Pipelines;

public class ConfigureRoutes
{
    public virtual void Process(PipelineArgs args)
    {
        RouteTable.Routes.MapRoute(
            name: "Accountlogout",
            url: "Account/Logout/{id}",
            defaults: new { controller = "Account", action = "Logout", id = UrlParameter.Optional }
            );
    }
}

    2. Point your Controller to move two folder up as

@Html.ActionLink("Logout", "Logout", "../../Account", null, new { @class = "btn btn-logout" })

That’s it. Now when I checked the link on page, it created correctly and working fine as

I hope you like this Sitecore tip. Stay tuned for more Sitecore related articles.

Till that happy sitecoring :)
Please leave your comments or share this article if it’s useful for you.

Thursday, January 12, 2017

How to publish a single file in Visual Studio


I just learn a new secret of Visual Studio.

There are almost 10 projects in my single solution in Visual Studio. Every time if I make the changes in any file I have to build and publish it again to verify the changes on browser. If some code file is there than it’s understood that we have to build the solution and publish it. 

However if some static file is there like HTML, ASPX, XML, JS, CSS etc., still I was build the whole project and publish it where no code changes are involved. Ultimately to test the page I have to reload my web application which take enough time.

But Visual Studio provide a nice feature of publishing only a single file. This feature is very useful if file is static like HTML, aspx, XML, JS, CSS, image etc. You can also publish the code file as well.

You can use any of the mentioned way to use this feature

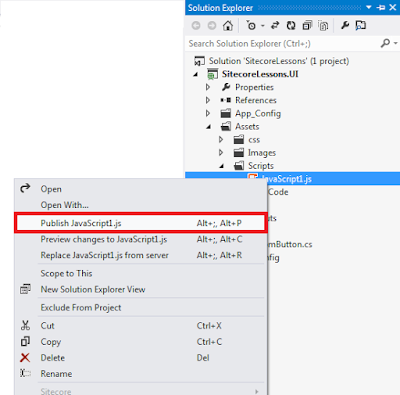
  • Just right click on file in Solution Explorer and select "Publish <FileName>".

  • Shortcut command is "Alt+; Alt+P".


Publish File from Solution Explorer


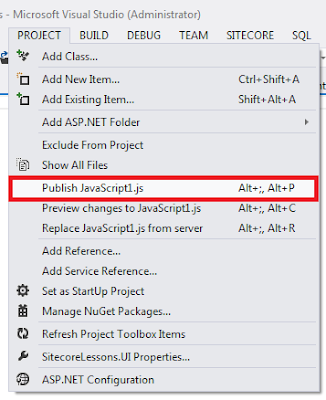
  • Project Menu -> "Publish <FileName>".


Publish File from Project Menu

It publish the single file within a fraction of second and now if you reload the page it will load quickly in browser.

I hope you like this hidden secret of Visual Studio. Stay tuned for more articles.

Please leave your comments or share this tip if it’s useful for you.