Surendra Sharma

Surendra Sharma

Search This Blog

Showing posts with label Sitecore. Show all posts

Monday, August 13, 2018

SSL certificates role in Sitecore 9

When you installed Sitecore 9 and above, setup should finished with two websites. Normally names like "*.dev.local" and "*_xconnect.dev.local".

Lets take an example of Habitat site.
 

"habitat.dev.local" runs on port 80 and 443 while "habitat_xconnect.dev.local" runs on HTTPS using 443 port. For running on HTTPS, we have to bind it to certificates.

Some of the questions about certificates that come to our mind are

  • How to bind certificates to websites?
  • How to change certificates to websites?
  • Where to find certificates?
  • Where to specify their thumbprint values?

How to bind/change certificates to these websites
Select website -> Click on Bindings -> Select Site running on port 443 and click on Edit -> Click on View button to view SSL certificate.
or change certifcates from available SSL certificates dropdownlist list.


SSL Certificate in IIS


Where to find certificates
For this click on Start -> search for "Manage Computer Certificates" -> This should open "certlm" -> Expand Personal -> Select "Certificates" -> Select your website and double click website -> This should open "Certificate" window -> Select "Details" tab -> Check "Thumbprint" property as shown below
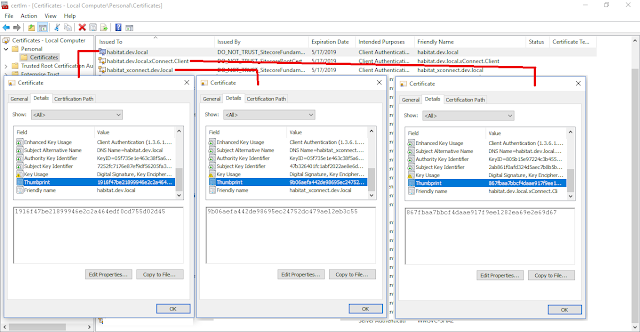

Available certificates in machine


You will get three certificates for each Sitecore 9 instance.

  • habitat.dev.local
  • habitat.dev.local.xConnect.Client
  • habitat_xconnect.dev.local

We can guess what are "habitat.dev.local" and "habitat_xconnect.dev.local", but what is "habitat.dev.local.xConnect.Client"?

Sitecore 9 is like client-server model where client is Sitecore webiste "habitat.dev.local" whereas xConnect instance "habitat_xconnect.dev.local" act as a server.

So if client want to communicate with server over secure HTTPS channel, they must agree with one thumbprint key. This thumbprint key is specified in new certificate "habitat.dev.local.xConnect.Client".

Where to specify thumbprint values for Sitecore and xConnect instances?
You have to specify
thumbprint value of "habitat.dev.local.xConnect.Client" at below locations.

For Sitecore website instance

 
Open "ConnectionStrings.config" from "C:\inetpub\wwwroot\habitat.dev.local\App_Config" and check below keys for client certificate thumbprint value

  • xconnect.collection.certificate
  • xdb.referencedata.client.certificate
  • xdb.marketingautomation.reporting.client.certificate
  • xdb.marketingautomation.operations.client.certificate


Thumbprint value in connectionstring.config


For xConnect instance
Open "AppSettings.config" from "C:\inetpub\wwwroot\habitat_xconnect.dev.local\App_Config" and check "validateCertificateThumbprint" key value.
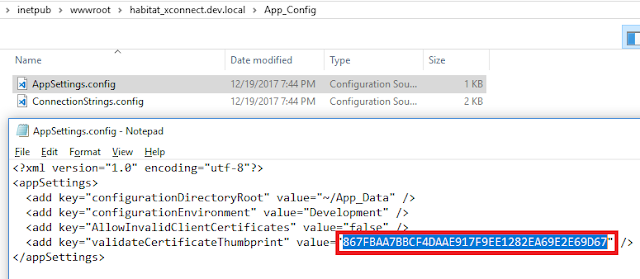


Thumbprint value in AppSettings.config


Certificate is complex subject but I hope these details helps you to understand certificates role in Sitecore 9. Stay tuned for more Sitecore related articles.

Till that happy Sitecoring :)


Saturday, August 4, 2018

Certification : Sitecore Context Marketing Fundamentals eLearning

Sitecore developer generally ignores marketing capabilities of #Sitecore. I found this $800 "Sitecore® Context Marketing Fundamentals eLearning" course very useful and eyes opener for the same.


Wednesday, August 1, 2018

Solved : Sitecore duplicate item issue

Issue:-
There are two items with the same name in my project Sitecore content tree - "Contact Us". On selecting one item, its showing the content properly, but on selecting another item, Sitecore showing "Object reference not set to an instance of an object." error as below.


I was unable to delete that item as unable to select it.


Solution:-
To delete this item, I 

  • Opened Sitecore DBBrowser as http://localhost:9090/sitecore/admin/dbbrowser.aspx 
  • Selected the item 
  • Deleted it.

Old trick, but very handy.

Monday, July 30, 2018

Blog Count reached to 2,00,000

My blog http://www.sitecorelessons.com/ crossed magical number 2,00,000+ for all time page visit. Please visit and have a look. 

Any suggestions/comments for improvement are always welcome.


Sunday, July 29, 2018

Certification - Sitecore Experience Commerce 9 200 - Essential

Cleared one more certification worth of $1500 - Sitecore® Experience Commerce™ 9 200 : Essentials


Certification - Sitecore Experience Commerce 9 200 - Essential


Friday, July 27, 2018

Certification - Sitecore Experience Commerce 9 100 - Overview

Cleared one more certification worth of $750 - Sitecore® Experience Commerce™ 9 100:Overview


Certification - Sitecore Experience Commerce 9 100 - Overview

Saturday, July 21, 2018

Sitecore 9 Certification

#sitecore certification was missing from my profile from a long time. Cleared Sitecore 9.0 Certification today


Monday, July 16, 2018

Could not find configuration node: federatedAuthentication/identityProviders/identityProvider[@id='Facebook']

I faced this error when deploying my local Habitat instance to fresh Sitecore instance running on Sitecore 9 update 1. I was getting this while opening Sitecore login screen.

There are two ways to resolve this issue


1. Create package of Domain, roles related with Facebook from existing running Sitecore instance and install it on target Sitecore instance.


2. Comment "<identityProviders hint="list:AddIdentityProvider">" section from \App_Config\Include\Project\<SitecoreInstanceName>.Website.config file


I hope these steps helps you to fix this issue. Stay tuned for more Sitecore related articles.

Till that happy Sitecoring :)

Please leave your comments or share this fix if it’s useful for you.

Monday, January 22, 2018

Sitecore: Rebuild Reporting Database

I have to rebuild Sitecore reporting databases for one of the client. I take references of different sites to complete this task as no sites provided end to end details. So I clubbed all these steps that worked for me.

The Sitecore Experience Database (xDB) uses two database systems (SQL Server and MongoDB) that need to be kept in sync to provide accurate data for Sitecore reporting applications:
  • MongoDB collection database: stores all experience data
  • SQL Server reporting database: stores aggregated reporting data
Sitecore automatically keeps these databases in sync but there are certain circumstances when we may need sync them manually, this operation is called rebuild of the reporting database.

Following are the steps to do this operation:
Let us assume, name of website is WebsiteName,

1.    First, make a new instance of Sitecore and get its Analytics database from SQL Server. Attach this database as new database to the WebsiteName SQL Server with name as WebsiteName_Analytics_Secondary.

2.    Make sure that the owner of this database is the user of WebsiteName_Analytics database.

3.    If you are running any Sitecore modules, such as WFFM, run the SQL script that adds the Fact tables for those modules against the secondary reporting database.
(I skipped this step)

·         Get the WFFM post installation SQL script (WFFM_Analytics.sql) and run it against the analytic database. If your website has installed the WFFM this SQL script can be found inside [site root]\Website\Data

·         Get the ECM post installation SQL script (Sitecore.EmailExperienceManager.sql) and run it against the analytic database.

·         Download and execute the WFFM.StoredProcesdure.AddFormStatisticsByContact.sql from https://kb.sitecore.net/en/Articles/2015/06/23/16/27/282795.aspx against the analytic database and do the requested change in the Sitecore.Analytics.Processing.Aggregation.config file.

4.      In file [site root]\Website\App_Config\ConnectionStrings.config, set the reporting.secondary property to the newly attached database as follows:

<add name = "reporting.secondary" connectionString = "user id = sql_server_user; password = user_password; Data Source = sql_server; Database = WebsiteName_Analytics_Secondary" />

5.     Set the time to clear the storage setting in file
[site root]\Website\App_Config\IncludeSitecore.Analytics.Processing.Aggregation.config as follows:

<reportingStorageManager type="Sitecore.Analytics.Aggregation.History.ReportingStorageManager" singleInstance="true">
        <TimeToClearStorage>0.00:05:00</TimeToClearStorage>

Note: Within this time we have to run some SQL scripts against the analytic database. So make sure set time is enough (usually 5-10 minutes) that is needed.

6.    Delete the content inside [site root]\Data\indexes\sitecore_analytics_index folder.

7.    Restart the IIS website. (I skipped this step)

8.    Comment the reporting.secondary connection string in file
[site root]\Website\App_Config\ConnectionStrings.config.

9.    Ensure that the dbo.Segments table in WebsiteName_Analytics database is not empty, by running: SELECT * FROM [WebsiteName_Analytics].[dbo].[Segments]

If this table is empty, then in web browser window, open link: <sitename>/sitecore/admin/redeploymarketingdata.aspx page and click the Redeploy Segments button.

10. Change the Deploy Date for the segment definitions in the Segments table of your Analytics (reporting) database to the date earlier than the first visit from your historic data was performed by running following query:

UPDATE [WebsiteName_Analytics].[dbo].[Segments]
SET [DeployDate] = '2015-02-05 09:09:45.500'

Note: if the deploy date is set to earlier date, then this step is already done.

11. Uncomment the reporting.secondary connection string in file
[site root]\Website\App_Config\ConnectionStrings.config.

12. Make sure the following files in [site root]\Website\App_Config\Include folder are enabled.
·         Sitecore.Analytics.Processing.Aggregation.Services.config
·         Sitecore.Analytics.Processing.Services.config


13. In the web browser window, open the rebuild reporting database history processing page using the link: <sitename>/sitecore/admin/RebuildReportingDB.aspx

14. Click Start to begin rebuilding the reporting database (synchronization processing).

15. In the Rebuild Reporting Database page, when you see "WaitReadyToReceiveData" status, copy the following marketing definition tables from the primary (WebsiteName _Analytics) to the secondary (WebsiteName_Analytics_Secondary) reporting database:
              i.        CampaignActivityDefinitions
             ii.        GoalDefinitions
            iii.        OutcomeDefinitions
           iv.        MarketingAssetDefinitions
            v.        Taxonomy_TaxonEntity
           vi.        Taxonomy_TaxonEntityFieldDefinition
          vii.        Taxonomy_TaxonEntityFieldValue
Run following query to do this:
INSERT INTO WebsiteName_Analytics_Secondary.dbo.CampaignActivityDefinitions
SELECT *
FROM WebsiteName_Analytics.dbo.CampaignActivityDefinitions ;

INSERT INTO WebsiteName_Analytics_Secondary.dbo.GoalDefinitions
SELECT *
FROM WebsiteName_Analytics.dbo.GoalDefinitions ;

INSERT INTO WebsiteName_Analytics_Secondary.dbo.OutcomeDefinitions
SELECT *
FROM WebsiteName_Analytics.dbo.OutcomeDefinitions ;

INSERT INTO WebsiteName_Analytics_Secondary.dbo.MarketingAssetDefinitions
SELECT *
FROM WebsiteName_Analytics.dbo.MarketingAssetDefinitions ;

INSERT INTO WebsiteName_Analytics_Secondary.dbo.Taxonomy_TaxonEntity
SELECT *
FROM WebsiteName_Analytics.dbo.Taxonomy_TaxonEntity ;

INSERT INTO WebsiteName_Analytics_Secondary.dbo.Taxonomy_TaxonEntityFieldDefinition
SELECT *
FROM WebsiteName_Analytics.dbo.Taxonomy_TaxonEntityFieldDefinition ;

INSERT INTO WebsiteName_Analytics_Secondary.dbo.Taxonomy_TaxonEntityFieldValue
SELECT *
FROM WebsiteName_Analytics.dbo.Taxonomy_TaxonEntityFieldValue ;


16.  The rebuild reporting database tool provides feedback while it is processing until the rebuild process is completed. Wait till "Process State: Completed".

17.  Change "reporting" connecting string "Database" attribute to Secondary reporting database and comment "reporting.secondary" connection string as follows:

<add name = "reporting" connectionString = "user id = sql_server_user; password = user_password; Data Source = sql_server; Database = WebsiteName_Analytics_Secondary" />

<!-- <add name = "reporting.secondary" connectionString = "user id = sql_server_user; password = user_password; Data Source = sql_server; Database = WebsiteName_Analytics_Secondary" /> -->

The xDB now uses the ‘WebsiteName_Analytics_Secondary’ database as its primary reporting database to collect new, live data from your website.


18. To verify that the reporting database was successfully rebuilt, open the Experience Analyltics UI. Your graphs and tables should be populated with data with the most recent visits to your website.

19. Do the following steps after status get Completed. Check whether the dbo.TreeDefinitions table of your reporting database contains any records.

If this table is empty, then copy data from the TreeDefinitions table of the new instance Sitecore reporting (Analytics) database.

I hope these steps help you to rebuild reporting database.

References: